검색결과 리스트
글
Parser 의 bind
결론부터 이야기하자면, 잘 모르겠다.
잘 모르겠으나 최대한 이해해 보려고 하는 차원에서 조금씩 뜯어보아 정리했다.
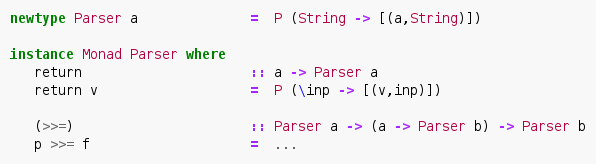

여기서 bind ( >>= ) 는 시그니쳐를 풀어보면 a 타입의 parser 를 첫번째 인자로, a 타입을 인자로 해서 b 타입의 parser 로 변환하는 함수를 두번째 인자로해서 b 타입의 parser 를 리턴한다.
정의를 살펴보면, .parse p inp 의 파싱이 성공한 경우 그 결과에 f 를 적용하여 Parser b 타입으로 ( 즉, b 타입을 파싱할 수 있는 함수 ) 변경하고, 이를 out 에 적용한다. ( 즉, out 으로부터 b 타입의 파싱을 시도한다 )
'Programming > Haskell' 카테고리의 다른 글
| IO Type (0) | 2015.05.20 |
|---|---|
| Parser in Haskell (0) | 2015.05.18 |
설정
트랙백
댓글
글
Unity3d 플러그인 - managed plugins
plugin
managed plugins
dll 로 외부 컴파일러로 빌드, 스크립트를 컴파일 하는 것도 가능. 프로젝트에 추가되어 어떤 다른 오브젝트든, 보통 스크립트처럼 사용 가능하다.
- Unity 에서 제공하지 않는 언어로 개발된 바이너리 로드
- Unity 코드를 소스제공 없이 이용할 수 있게 배포
Creating a DLL
- .NET 코드를 생성하는 컴파일러를 선택
- Unity API 를 사용하지 않는다면 컴파일러 옵션을 적절하게 선택하는 것만으로 DLL 을 생성
- Unity API 를 사용한다면 Unity 자체의 DLL 을 컴파일러에서 사용가능하도록 만들어야한다.
Unity API
mac
- UnityEngine.dll / UnityEditor.dll
- /Applications/Unity/Unity.app/Contents/Frameworks/Managed/
- contextual menu (right click on unity) > Show Package Contents command
windows
- UnityEngine.dll / UnityEditor.dll
- C:\Program Files\Unity\Editor\Data\Managed
compile option example
- mcs -r:/Applications/Unity/Unity.app/Contents/Frameworks/Managed/UnityEngine.dll -target:library ClassesForDLL.cs
- -r : included library path
- -target : build type
- (path) name
Tutorial
Add Reference on Unity DLL
mac (MonoDevelop)
- References > Edit References > .Net Assembly tab > File System > select file.
windows
- References > Add Reference > Browse > select file
Write DLL Code
- Using DLL in Unity
- copy builded dll into asset folder
- Setting UP Debugging
- mac
- copy mdb into Assets/Plugins
- Add-in Manager > Installed tab > Unity > select Mono Soft Debugger Support For Unity > Enable
- windows
- pdb to mdb
- Program Files\Unity\Editor\Data\Mono\lib\mono\2.0\pdb2mdb.exe
- mac
설정
트랙백
댓글
글
Daytime.2 - A synchronous TCP daytime server
다음에 기반함
http://www.boost.org/doc/libs/1_57_0/doc/html/boost_asio/tutorial/tutdaytime2.html
이번엔 TCP asio 를 사용하여 어떻게 서버 응용프로그램을 구현할 수 있는지 살펴본다.
#include <ctime>
#include <iostream>
#include <string>
#include <boost/asio.hpp>

using boost::asio::ip::tcp;
클라이언트로 다시 보내줄 문자열을 생성하는 make_daytime_string() 함수를 정의해보겠다.
이 함수는 daytime 서버 응용프로그램 내에서 재사용 될 것이다.
std::string make_daytime_string()
{
  using namespace std; // For time_t, time and ctime;
  time_t now = time(0);
  return ctime(&now);
}

int main()
{
  try
  {
    boost::asio::io_service io_service;
ip::tcp::acceptor 객체는 새로운 커넥션을 listen 하기 위해 생성하였다. IPv4, TCP 포트 13 을 listen 하도록 초기화 했다.
tcp::acceptor acceptor(io_service, tcp::endpoint(tcp::v4(), 13));
한번에 하나의 커넥션을 다루는 iterative 서버가 될 것이다. 클라이언트의 커넥션을 표현할 socket 를 생성하고, 커넥션을 기다리도록 하자.
 for (;;)
    {
      tcp::socket socket(io_service);
      acceptor.accept(socket);
클라이언트가 우리의 서비스에 접속했다. 현재 시간을 확인하고 클라이언트로 정보를 보낸다.
      std::string message = make_daytime_string();

      boost::system::error_code ignored_error;
      boost::asio::write(socket, boost::asio::buffer(message), ignored_error);
    }
  }
마지막으로, 예외를 처리한다.
 catch (std::exception& e)
  {
    std::cerr << e.what() << std::endl;
  }

  return 0;
}
- full_source code
- main
- 실행결과

'Programming > Boost asio' 카테고리의 다른 글
| Daytime.3 - An asynchronous TCP daytime server (0) | 2016.04.03 |
|---|---|
| Daytime.1 - A synchronous TCP daytime client (0) | 2015.04.13 |
| Tutorial 5. Synchronising handlers in multithreaded programs (0) | 2015.04.11 |
| Tutorial 4. member function handler (0) | 2015.03.17 |
| Tutorial 3. Binding arguments to a handler (0) | 2015.03.15 |
